Adding a New Connector
You can add a new connector by defining connector name and type and entering connector server information. The procedure varies depending on what kind of connector you are adding
Before you Begin
Obtain the connection settings for the target content system from the administrator of that system.
Procedure
- Log in to Digital Hive with an account that has administrative privileges.
 Note: The first account to log in to a newly installed Digital Hive server is automatically granted administrative privileges.
-
At the top right corner of the Digital Hive interface, click the applications icon (
 ) and in the
Applications box that appears, click the Administration icon.
) and in the
Applications box that appears, click the Administration icon.
The Digital Hive Admin Panel panel opens.
-
In the menu bar, click Systems.
The Systems > Manage page opens.
-
At the bottom right corner of the page, click the Add icon (
 ).
).
The Add Connector box opens, showing the Server info sets section.
- In the Default Connector Name field, type a descriptive name for the new connector.
-
From the Connector Type drop-down box, select the type of content system, from the prepopulated list, for example, something similar to:
- Digital Hive
- Box Cloud
- IBM Cognos
- File System
- Google Drive
- MicroStrategy
- Oracle Business Intelligence Enterprise Edition
- Microsoft PowerBI
- Qlik Sense Server
- QlikView Server
- Salesforce
- Microsoft SharePoint Online
- Microsoft SQL Server Reporting Services
- Tableau Server
- ThoughtSpot
- IBM Cognos TM1
The Add Connector box refreshes and displays fields applicable to the connector type that you chose.
Note: This list changes often, as the Digital Hive team often adds new connectors. What you see may not exactly
match this list.
- From this point on, the procedure varies based on which kind of connector you are adding. For content-system-specific instructions, consult the relevant topic for your connector in this section.
Adding a Box Cloud Connector
Box Cloud is one of the easier content system connectors to add to Digital Hive
Before you Begin
- Your organization must already have a Box.com™ plan that provides API access ("Business", "Business Pro", or "Enterprise")
-
Obtain from your Box administrator the following information about your Box API configuration:
- Client ID
- clientSecret
- OAuthRedirectUri
Procedure
- Log in to Digital Hive with an account that has administrative privileges.
-
At the top right corner of the Digital Hive interface, click the applications icon () and in the Applications box
that appears, click the Administration icon.
The Digital Hive Admin Panel panel opens.
-
In the navigation bar, click Systems.
The Systems > Manage page opens.
-
At the bottom of the corner page, click the Add icon ().
The Add Connector box opens.
- In the Default Connector Name field, type a descriptive name for the new connector.
- From the Connector Type drop-down box, select Box Cloud.
-
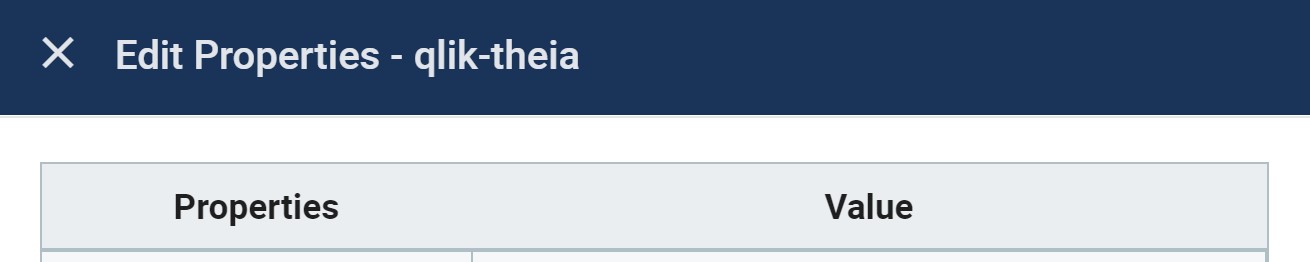
At the bottom of the Edit Connector box, click Edit Properties.
The Edit Properties - (Connector name) box opens.
Note: Disregard the Add Connector Settings button; it is not used when adding a Box Cloud connector.
-
If no properties are shown, click Add them now.
Properties appear in a table.
-
Add the following properties and values in the table in the Edit Properties - (Connector name)
box.
| Property (case-sensitive) |
Value |
|
clientId
|
The value of the
Client ID
from your Box Cloud interface
|
|
clientSecret
|
The value of your
clientSecret
from your Box Cloud interface
|
|
oAuthRedirectUri
|
The value of your OAuth redirect URI from your Box Cloud interface |
- Click OK at the bottom of the Edit Properties - (Connector name) box and then again in the Add Connector box.
-
At the top right of the Systems > Manage page, click Apply.
Digital Hive saves your settings.
Next Steps
Adding a Cognos Connector
The process for adding a Cognos connector can be broken down into several procedures, all of which are required.
Before you Begin
Obtain the Cognos connection settings from your Cognos administrator.
About this task
You must add a Cognos connector for each Cognos instance that you wish Digital Hive to access. All of the steps listed below are required.
Procedure
-
Complete the steps in
Adding a Basic Connection Settings for a Cognos Connector
-
Complete the steps in
Completing the Server Info Sets Section for a Cognos Connector
- Complete the steps in Testing the Connection to a Content System
- Complete the steps in Adding a Credential to your Digital Hive Identity
- Complete the steps in Mounting Folders
Adding a Basic Connection Settings for a Cognos Connector
This procedure is the first step in adding a Cognos connector.
Procedure
- Log in to Digital Hive with an account that has administrative privileges
-
At the top right corner of the Digital Hive interface, click the applications icon () and in the Applications box
that appears, click the Administration icon.
The Digital Hive Admin Panel panel opens.
-
In the navigation bar, click Systems.
The Systems > Manage page opens.
-
At the bottom right corner of the page, click the Add icon ().
The Add Connector box opens.
- In the Default Connector Name field, type a descriptive name for the new connector.
-
From the Connector Type drop-down box, select IBM Cognos.
The Add Connector box refreshed and displats fields applicable to IBM Cognos, that is:
-
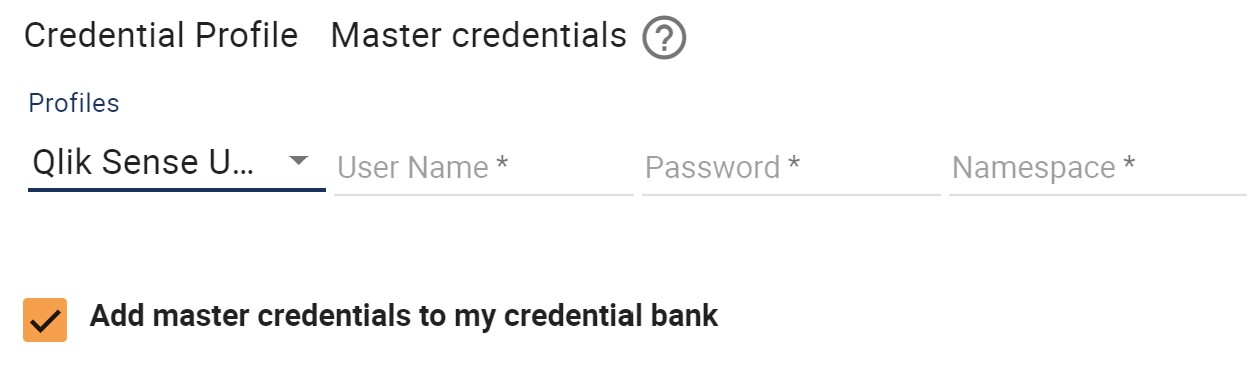
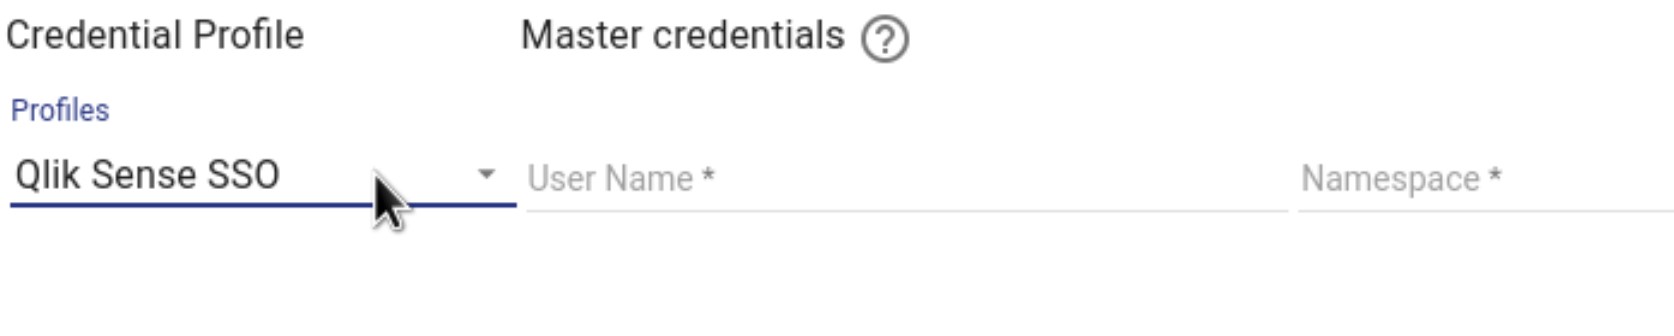
Optional: In the Credential Profile drop-down list, select one of the following:
- None
- Cognos Default
- Cognos SSO (if your Cognos installation is using SSO)
If you selected Cognos Default, the User Name, Password, and Namespace fields displat under Master credential, along with the
Add master credentials to my credential bank check box, selected.
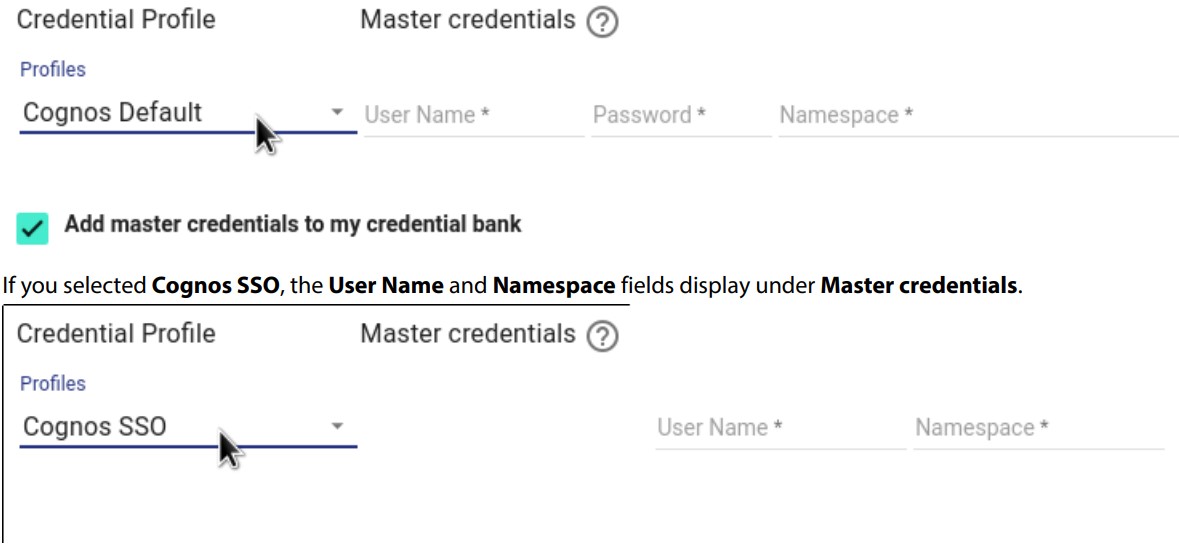
- In the Master credentials section, type the store credentials User Name, Password(if applicable, and Namespace in their respective fields.
Next Steps
Completing the Server Info Sets Section for a Cognos Connector
Completing the Server Info Sets Section for a Cognos Connector
This procedure is the second step required in order to successfully add a Cognos connector to Digital Hive
Before you Begin
Procedure
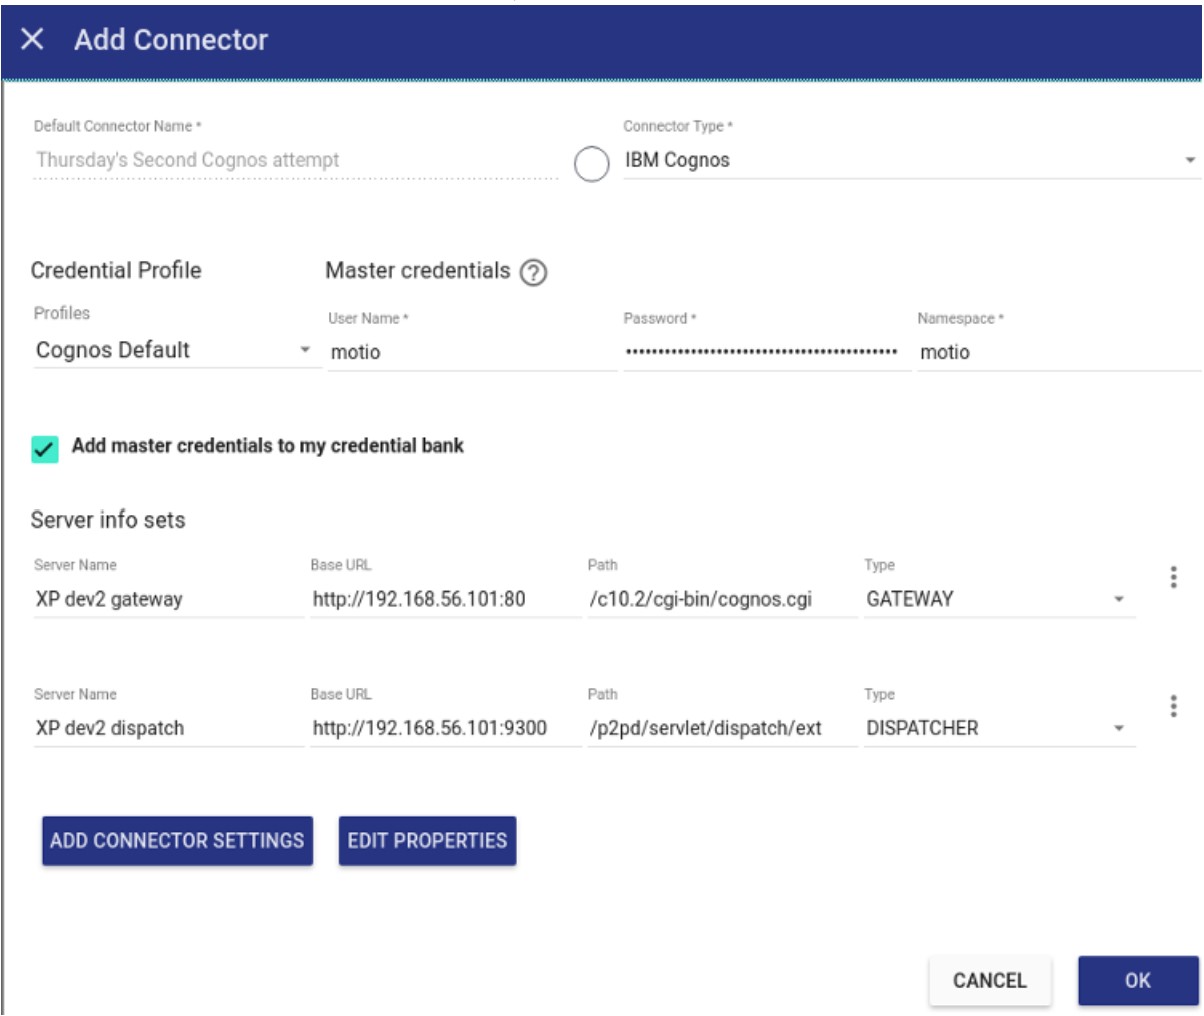
-
In the Server info sets section, click Add connector Settings.
The following fields appear in the Server info sets field group:
- Server Name
- Base URL
- Path
- Type (Dispatcher or Gateway
- Enter your Cognos dispatcher information in the Server info sets field group using the information from your Cognos administrator.
-
Click Add Connector Settings.
A second row of fields appears below the fields that you just completed.
-
Enter your Cognos gateway information using the information from your Cognos administrator.
Figure 1: Sample Cognos dispatcher and gateway settings in the Add Connector box
-
Click OK
The Add Connector box closes, and the Apply button appears at the top right.
-
Click Apply
Digital Hive saves the Cognos connector information.
Next Steps
Adding a File System Connector
You can connect Digital Hive to folders on the Digital Hive server for use in Game Boards. The process for adding a file system connector requires several steps, broken down here into discrete procedures.
About this Task
Complete all of the procedures listed below, in the following order.
Procedure
-
Complete the steps in
Updating the Hostname Property Used for File System Connection
(if applicable)
-
Complete the steps in
Adding a Basic Connection Settings for a File System Connector
-
Complete the steps in
Completing the Server Info Sets Section for a File System Connector
-
Complete the steps in
Adding Credentials for a File System Connector in Profile Settings
-
Complete the steps in
Mounting the First Folder for a File System Connector
Next Steps
Add the folder to one or more Game Boards, using a Folder Browser tile.
Updating the Hostname Property Used for File System Connection
If the hostname used to access Digital Hive has changed since installation, you will need to update it before you can add a file system connector.
About this Task
The file system connection function uses the property
motio.adfcore.instance.baseUrl
, which is set when Digital Hive is installed. If the hostname used to connect to Digital Hive changes, you must update that property to the new hostname before you can add a file system connector.
Procedure
-
Stop the Digital Hive server by executing the following command on the computer on which Digital Hive is installed:
For UNIX or Linux:
{path to Theia apache dir.}/bin/theia.sh stop
For Windows:
{path to Theia apache dir.}\bin\theia.bat stop
-
modify the property:
motio.adfcore.instance.baseUrl.
- Save and close the file.
-
restart the Digital Hive Server:
For UNIX or Linux:
{path to Theia apache dir.}/bin/theia.sh start
For Windows:
{path to Theia apache dir.}\bin\theia.bat start
Adding a Basic Connection Settings for a File System Connector
This procedure is the first of four when adding a file system connector to Digital Hive
Before you Begin
Procedure
- Log in to Digital Hive with an account that has administrative privileges.
-
At the top right corner of the Digital Hive interface, click the applications icon () and in the Applications box that appears,
click the Administration icon.
The Digital Hive Admin Panel panel opens.
-
In the navigation bar, click Systems.
The Systems > Manage page opens.
-
At the bottom right corner of the page, click the Add icon ().
The Add Connector box opens.
- In the Default Connector Name field, type a descriptive name for the new connector.
- From the Connector Type dowp-down box, select File System.
- In the Profiles field (Credential Profile section), select File System.
Next Steps
Completing the Server Info Sets Section for a File System Connector
This procedure is the second of four when adding a file system connector to Digital Hive.
Before you Begin
Procedure
-
Click Add Connector Settings.
A Server info sets section opens, with a row of fields below the Credential profile and Master credentials sections.
-
In the Server Name field, type a descriptive name for this row of information, for your refrence.
Note: This value does not have to be the literal name of the server.
-
In the Base URL field, type drive and path to a folder on the Digital Hive server, following the pattern:
file:///{Drive}:/{Path to folder}
For example, for Windows:
file:///C:/Users/Me/MyFiles
For UNIX or Linux:
file:///home/theia/docs-for-gameboards
- Disregard the Path field.
- From the Type field, select LOCAL_FILESYSTEM.
-
Click OK.
The Add Connector box closes.
- On the Systems > Manage page, click Apply.
Next Steps
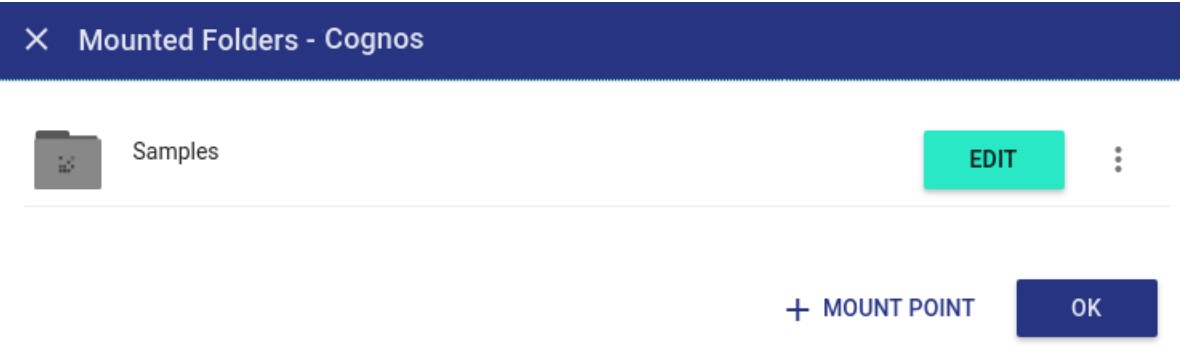
Mounting the First Folder for a File System Connector
This procedure is the last of four when adding a file system connector to Digital Hive
Before you Begin
Complete the following procedures:
About this Task
Mounted folders are starting points within content systems that have a folder structure. They enable Digital Hive to see all content or a subset of content for a given content system. You can mount multiple
folders. Use mounted folders to control what content is shared with Digital Hive.
Note: Digital Hive content exposed via a mounted file system is open to all authenticated users.
Procedure
-
If the connector name has a yellow flag next to it, refresh your browser.
he page should reload, displaying the connector name without the yellow flag.
- On the Systems > Manage page, locate the connector and click the context menu icon (
 ) at the right of that row.
-
In the context menu that appears, select Mounted Folders.
The Mounted Folders - {Connector name} box opens.
-
Do one of the following:
- Click Configuring a new starting folder for {Connector name}.
- Click + Mount Point.
The Select Folder box opens.
-
In the left panel double-click the folder that you wish to use as the mounted folder, and click OK.
The folder appears in the Mounted Folders - {Connector name} box.
-
Click Add and then click OK.
Digital Hive saves the folder as a mounted folder.
Adding a Google Connector
You can create a connector to your Google Docs™ documents or other Google® products.
Before you Begin
You must have created a Google application using the Google Apps™ interface.
Procedure
- Log in to Digital Hive with an account that has administrative privileges.
-
At the top right corner of the Digital Hive interface, click the applications icon () and in the Applications box that appears,
click the Administration icon.
The Digital Hive Admin Panel panel opens.
-
In the navigation bar, click Systems.
The Systems > Manage page opens.
-
At the bottom right corner of the page click the Add icon ().
The Add Connector box opens.
- In the Default connector Name field, type a descriptive name for the new connector.
- From the Connector Type drop-down box, select Google Drive.
-
if a profile exists for the connector, select it from the Profiles
drop-down box.
-
Obtain from your Google Apps™ console the following data:
- ClientID
- appSecret
- Redirect URI
-
A the bottom of the Edit Connector box, click Edit properties.
The Edit Properties - (Connector name) box opens.
Note: Disregard the Add connector Settings button; it is not used in this procedure.
-
If no properties are shown, click Add them now.
Properties appear in a table.
-
Add the following properties and values in the table in the Edit Properties - (Connector name) box:
| Property (case-sensitive) |
Value |
|
appID
|
The value of the
Client ID
from your Google Apps™ interface
|
|
appSecret
|
The value of your appSecret from your Google Apps™ interface |
|
redirectURI
|
The value of your redirect URL from your Google Apps™ interface |
- Click OK at the bottom of the Edit Properties - (Connector name) box and then again in the Add Connector box.
-
At the top right of the Systems > Manage page, click Apply.
Digital Hive saves the settings of your new connector.
Adding a MicroStrategy Connector
The process for adding a MicroStrategy connector can be broken down into four main procedures, listed below.
Before you Begin
Ensure that you are able to contact and request information from your MicroStrategy administrator.
Procedure
- Getting the Necessary Connection Information from your MicroStrategy Administrator
- Adding the Basic Connection Settings for a MicroStrategy Connector
- Completing the Server Info Sets Section when Adding a MicroStrategy Connector
- Adding MicroStrategy Properties
Next Steps
After adding the connector, you must do the following before you can manage content with this connector:
- Add a MicroStrategy credential to your Digital Hive profile.
- Mount at least one MicroStrategy folder.
Adding the Basic Connection Settings for a MicroStrategy Connector
This procedure is the second required in order to successfully add a MicroStrategy connector to Digital Hive.
Before you Begin
Complete the steps in
Getting the Necessary Connection Information from your MicroStrategy Administrator
.
Procedure
- Log in to Digital Hive with an account that has administrative privileges.
-
At the top right corner of the Digital Hive interface, click the applications icon () and in the Applications box that appears,
click the Administration icon.
The Digital Hive Admin Panel panel opens.
-
In the navigation bar, click Systems.
The Systems > Manage page opens.
-
At the bottom right corner of the page, click the Add icon ().
The Add Connector box opens, showing the Server info sets section.
- In the Default Connector Name field, type a descriptive name for the new connector.
-
From the Connector Type drop-down box, select MicroStrategy.
The Add Connector box refreshes and displays the Credential Profile and Master Credentials sections.
-
From the Profiles drop-down list in the Credential Profile, select MicroStrategy User Pass.
In the Master credentials section, two fields appear: User Name and Password.
-
Type the administrative user name and password for your MicroStrategy
server in their respective fields.
Next Steps
Complete the steps in
Completing the Server Info Sets Section for a Cognos Connector.
Completing the Server Info Sets Section for a Cognos Connector
This procedure is the third of four basic procedures required in order to successfully add a MicroStrategy connector to Digital Hive.
Before you Begin
Procedure
- Click the Add Connector Settings.
- In the Server info sets section, a row of fields appears.
-
In the Server Name field, type a descriptive name for the server.
Note: This value does not have to be the actual MicroStrategy domain name.
-
In the Base URL field , type the MicroStrategy web access URL, including the port number.
For example,
http://mstr.example.com:8443
- Leave the Path field empty.
- In the Type drop-down list, select WEB_SERVER.
Next Steps
Complete the steps in Adding MicroStrategy Properties
Adding MicroStrategy Properties
This procedure is the fourth basic procedure required in order to successfully add a MicroStrategy connector to Digital Hive.
Before you Begin
After completing the above procedures, the Add Connector box should be open, with one row of information in the Server info sets
section completed.
Procedure
-
Click Edit Properties.
The Edit properties - (Connector name window opens, showing empty properties table.
-
Click Add them now.
The table refreshes, showing two rows of properties.
-
Complete the table as described below.
| Property |
Value |
| loginMode |
Standard |
| iServerName |
The name of your MicroStrategy server |
- Click OK to close the window.
-
In the Add Connector box, click OK.
The Add Connector box closes, and an active Apply button appears at the top right of the Systems > Manage page.
-
Click Apply.
Digital Hive saves the MicroStrategy connector information. The MicroStrategy connector is now added, but you must add a credential and mount a folder before it can be managed.
Next Steps
Adding a Microsoft® Power BI connector
The process for adding a Power BI connector consists of several steps, broken down here into three procedures.
Before you Begin
You or your Power BI administrator must have created a Power BI application for use with Digital Hive using the Microsoft Azure® interface.
Procedure
-
Getting the Necessary Connection Information from your SharePoint Administrator
- Entering SharePoint Connection Settings
- Updating your Profile with SharePoint Credentials
Entering PowerBI Connection Settings
After obtaining the necessary information from your Power BI administrator, enter the information in Digital Hive.
Before you Begin
Getting the Necessary Connection Information from your SharePoint Administrator
Procedure
- Log in to Digital Hive with an account that has administrative privileges.
-
At the top right corner of the Digital Hive interface, click the applications icon () and in the
Applications box that appears, click the Administration icon.
The Digital Hive Admin Panel panel opens.
-
In the menu bar, click Systems.
The Systems > Manage page opens.
-
At the bottom right corner of the page, click the Add icon ().
The Add Connector box opens.
- In the Default Connector Name field, type a descriptive name for the new connector.
- From the Connector Type drop-down box, select Microsoft PowerBI.
- If a profile exists for the connector, select it from the Profiles drop-down box.
-
In the Server info sets section, click Add Connector Settings.
A new set of fields appears in the Server info sets
section.
-
Enter the following values in the four fields that appear, and click Add Connector Settings after each row to display another row of empty fields.
| Server Name |
Base URL |
Path |
Type |
|
AZURE_AD_AUTH_URL
|
https://login.microsoftonline.com |
/common/oauth2/authorize
|
REST |
|
AZURE_AD_TOKEN_URL
|
https://login.microsoftonline.com |
/common/oauth2/token
|
REST |
|
AZURE_AD_USERINFO_URL
|
https://graph.microsoft.com |
/v1.0/me
|
REST |
|
SP_BASE_URL
|
https://api.powerbi.com |
/v1.0/myorg/
|
REST |
|
MS_GRAPH_URL
|
https://analysis.windows.net |
/powerbi/api
|
REST |
-
Click Edit Properties.
The Edit Properties - (Connector Name) box opens.
-
If no properties are shown, click Add them now.
Properties in a table.
-
Enter the following information in the table show in the Edit Properties - (Connector name) box.
| Properties (drop-down menu) |
Value |
| appID |
The application ID obtained from your Power Bi administartor |
| appSecret |
The appSecret value from you Power BI Administrator |
| redirectURI |
The Reply URL obtained from your Power BI administrator |
-
Click the prepopulated value in the
redirectURI
field to the App ID URI field in Azure and save the app in Azure.
- Click OK to close the Edit Properties - (Connector name) box an then click OK to close the Add Connector box.
-
At the top right of the Systems > Manage page, click Apply.
Digital Hive saves your settings.
Next Steps
Getting the Necessary Connection Information from your SharePoint Administrator
Updating your Profile with Power BI Credentials
After adding Power BI connection settings, update your credentials in the My profile settings box so that you can add your first mounted folder.
Procedure
- At the top right corner of the Digital Hive interface, click your user icon.
-
In the menu box that displays, click the Profile settings
icon.
The My profile setting box opens.
-
In the top menu of the My profile settings box, select
Credentials.
The Credentials section, listing existing connectors, slides into view, with MS Power BI preselected.
-
Click Sign In.
Digital Hive quickly opens and closes a pop-up window, automatically signing in to Power BI, and notifies you that credentials have been saved.
Next Steps
Add one or more Power BI mounted folders, as described in Mounting Folders>.
Adding a Microsoft SQL Server Reporting Services Connector
The process for adding a Microsoft SQL Server Reporting Services connector requires several steps, broken down here into discrete procedures.
Before you Begin
- Ensure that your Microsoft SQL Server Reporting Services server is running.
- Ensure that you have the credentials for that server, including server name, user name, password, and web access URL.
About this Task
All of the procedures listed below are required and should be completed in the following order.
Procedure
-
Adding the Basic Connection Settings for a Microsoft SSRS Connector
-
Completing the Servrer Info Sets Section when Adding an SSRS Connector
- Adding the SSRS Credentials in Profile Settings
- Mounting the First Folder for a Microsoft SSRS Connector
Adding the Basic Connection Settings for a Microsoft SSRS Connector
This procedure is the first of four required in order to successfully add a Microsoft SSRS connector to Digital Hive.
Procedure
- Log in to Digital Hive with an account that has administrative privileges.
-
At the top right corner of the Digital Hive interface, click the applications icon () and in the
Applications box that appears, click the Administration icon.
The Digital Hive Admin Panel panel opens.
-
In the menu bar, click Systems.
The Systems > Manage page opens.
-
At the bottom right corner of the page, click the Add icon ().
The Add Connector box opens.
- In the Default Connector Name field, type a descriptive name for the new connector.
-
From the Connector Type drop-down box, select Microsoft SQL Server Reporting Services.
The Add Connector box refreshes and displays the Profiles drop-down box.
-
If a profile exists for the connector, select it from the Profiles drop-down box.
The Add Connector box refreshes and displays the following fields:
- User Name
- Password
- Add master credentials to my credential bank check box
-
For the User Name> field, type the Windows domain and user name, separated by a backward slash.
For example:
MyWinDomain\Administrator
-
In the Password> field, type the SSRS server computer password that matches the user name entered.
Note: For now, you can disregard the Namespace field.
Next Steps
Completing the Servrer Info Sets Section when Adding an SSRS Connector
Completing the Server Info Sets Section when Adding an SSRS Connector
This procedure is the second of four required in order to successfully add a Microsoft SSRS connector to Digital Hive.
Before you Begin
Procedure
-
Click Add Connector Settings.
In the Server info sets section, a row of fields appears.
-
in the Server Name field, type a descriptive name for the server.
Note: This value does not have to be the actual SQL Server domain name.
-
In the Base URl field, type the SQL Server web access URL.
For example,
http://192.168.253.140:80
-
In the Path field, type the folder on your SQL Server server that contains the artifacts that you wish to connect to.
For example,
REPORT_SERVER
-
Click OK.
The Add Connector box closes, and the new connector displays in the list of connectors in the Systems > Manage page.
-
At the top right of the page, click Apply.
Digital Hive saves the connector information and refreshes the page.
Next Steps
Adding the SSRS Credentials in Profile Settings
Adding the SSRS Credentials in Profile Settings
This procedure is the third of four when adding a Microsoft SSRS connector to Digital Hive. This procedure is necessary only if when adding the basic connector settings, you cleared the
Add master credentials to my credential bank check box.
Before you Begin
Complete the following procedures:
Procedure
-
At the top right of the Digital Hive interface, click your profile icon to open the user menu

-
In the menu that appears, click the Profile settings icon.

The My Profile Settings box opens.
- In the top menu of the My profile settings box, select Credentials to display the credentials section.
-
At the top right of the Credentials section, click the add icon ().
The Add New Credentials box opens.
- At the top left, select the connector for which to add credentials.
-
For the User Name field, do one of the following:
- If the SSRS server is running under a Windows domain user account, type the Windows domain and user name, separated by a backward slash.
- If the SSRS server is running under a built-in account, type the SSRS server account and user name, separated by a backward slash.
For example:
-
With Windows domain:
MyWinDomain\Administrator
-
Without Windows domain:
SSRS-2\Administrator
- In the Password field, type the SSRS server computer password that matches the user name entered.
-
For now, in the Namespace> drop-down list select the name that you entered in the Default Connector Name> field when completing
Adding the Basic Connection Settings for a Microsoft SSRS Connector
.
-
Click Add.
Digital Hive saves the SSRS credential settings, and the new credentials display in the list of credentials in the My profile settings> box.
Next Steps
Mounting the First Folder for a Microsoft SSRS Connector
Mounting the First Folder for a Microsoft SSRS Connector
This procedure is the last of four required in order to successfully add a Microsoft SSRS connector to Digital Hive.
Before you Begin
Complete the following procedures:
About this Task
Mounted folders are starting points within content systems that have a folder structure. They enable Digital Hive to see all content or a subset of content for a given content system. You can mount multiple
folders. Use mounted folders to control what content is shared with Digital Hive.
Procedure
-
At the top right corner of the Digital Hive interface, click the applications icon () and in the Applications box
that appears, click the Administration icon.
The Digital Hive Admin Panel panel opens.
- In the navigation bar, click Systems.
- On the Systems > Manage page, locate the connector and click the context menu icon () at the right of that row.
-
In the context menu that appears, select Mounted Folders.
The Mounted Folders - {Connector name} box opens.
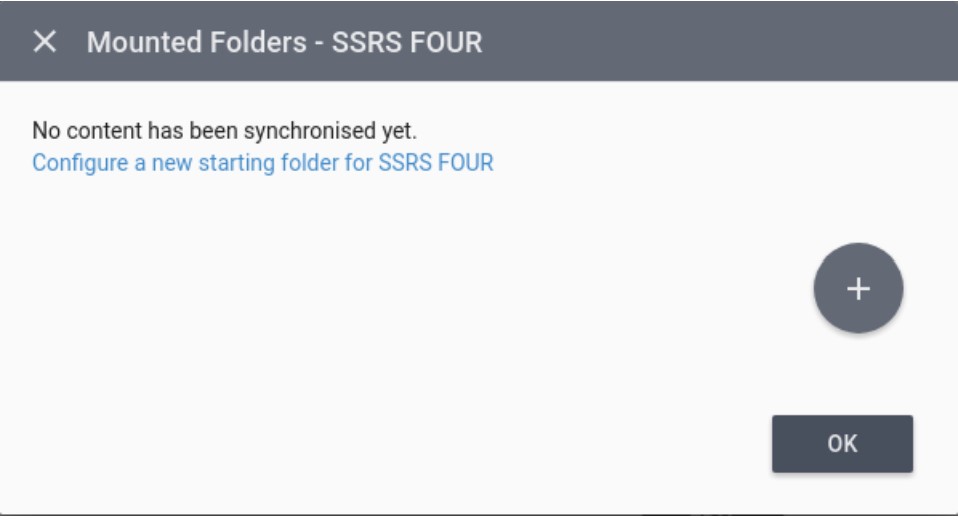
-
Click Configure a new starting folder for {content system}.
A row with a Start Folder Name field appears, along with a Browse> icon, Advanced> drop-down menu, and Add and Cancel buttons.
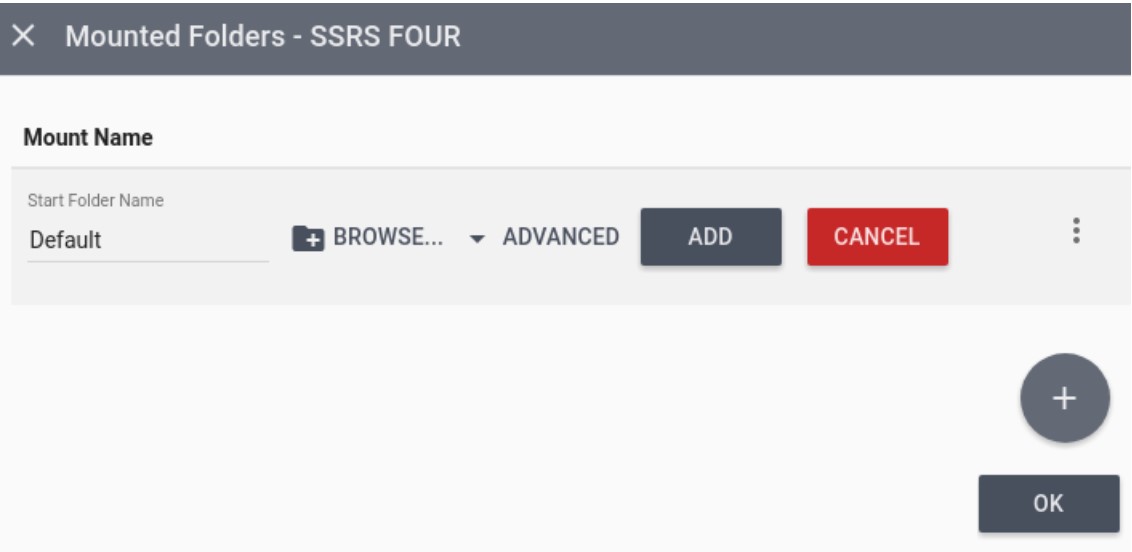
- In the Start Folder Name field, type a descriptive name for display in Digital Hive.
- Click Browse.
- In the Select folder window that opens, select the folder that you wish to mount, and then click Select.
-
Click Add.
If all the previous steps in this section have been successfully completed, Digital Hive adds the folder in the
mounted Folders
box, showing its mount name and the name of the folder itself.
-
Click OK.
Digital Hive stores the mounted folder information and the Mounted Folders box closes. Digital Hive can now see the content in the mounted folder for this connector, and you can add artifacts from the
mounted SSRS folder to Game Boards.
Adding an Oracle Business Intelligence Enterprise Edition Connector
The process for adding a Oracle Business Intelligence Enterprise Edition connector can be broken down into two main procedures, listed below.
Procedure
-
Adding an Oracle Business Intelligence Enterprise Edition Connector
- Completing the Server Info Sets Section
Adding the Basic Connection Settings for an Oracle Business Intelligence Enterprise Edition Connector
This procedure is the first step in adding an Oracle Business Intelligence Enterprise Edition connector.
Procedure
- Log in to Digital Hive with an account that has administrative privileges.
-
At the top right corner of the Digital Hive interface, click the applications icon () and in the Applications box
that appears, click the Administration icon.
The Digital Hive Admin Panel panel opens.
-
In the navigation bar, click Systems.
The Systems > Manage page opens.
-
At the bottom right corner of the page, click the Add icon ().
The Add Connector box opens, showing the
Add master credentials to my credential bank
check box.
- In the Default Connector Name field, type a descriptive name for the new connector.
-
From the Connector Type drop-down box, select Oracle Business Intelligence Enterprise Edition
The Add Connector> box refreshes and displays the Profiles drop-down box.
-
Optional: If a profile exists for the connector, select it from the Profiles drop-down box.
The Add Connector box refreshes and displays fields applicable to Oracle Business Intelligence Enterprise Edition (OBIEE), that is:
- Credential Profile
- Master Credentials
- Add Master Credentials to my Credential Bank check box
The User Name and Password fields display under Master credentials.
- In the Master Credentials section, type the UserName and Password, in their respective fields.
Next Steps
Completing the Server Info Sets Section
Completing the Server Info Sets Section when Adding an Oracle Business Intelligence Enterprise Edition Connector
When completing the Oracle Business Intelligence Enterprise Edition Server info sets field group, only one row is required.
Before you Begin
Procedure
-
Click Add Connector Settings.
A second row of fields appears below the fields that you just completed.
- In the Server Name field, type a descriptive name for the server.
- In the Base URL field, type the OBIEE web access URL, including domain and port number.
- In the Path field, type the folder on your OBIEE server that contains the artifacts that you wish to access.
-
In the Type drop-down list, select
REPORTER_SERVER.
-
Click OK.
The Add Connector box closes, and the Apply button appears at the top right.
-
Click Apply.
Digital Hive saves the Oracle Business Intelligence Enterprise Edition connector information
Next Steps
- Testing the Connection to a Content System
- Adding a Credential to your Digital Hive Identity
- Mounting Folders
Generating a Java Keystore for use with Qlik Sense
Before you Begin
Complete the steps in
Getting the Necessary Connection Information from your Qlik Sense Administrator and Network Administrator
.
About this Task
This procedure is the second of five required in order to fully add a Qlik Sense connector.
Procedure
-
Create a client Java keystore by executing the following command.
"%PathtoJREKeytool%\keytool.exe" -importkeystore -srckeystore "client.pfx" -srcstoretype pkcs12 -destkeystore "client.jks" -deststoretype JKS -srcstorepass secret -deststorepass secret -noprompt
Note: In the example, "secret" appears twice; the first time as the password for the certificate file, and the second time,
as the password to set up the JKS file.
-
Create a server Java keystore by executing the following command.
%PathtoJREKeytool%\keytool.exe" -import -alias QlikCA -keystore "root.jks" -file "root.cer" -storepass secret -noprompt
Note: The term "secret>" in this example is the password for the JKS file.
-
Copy the generated
client.jks
and
root.jks
files to a directory that is outside of the Digital Hive installation directory and that the user running the Digital Hive process can access.
Next Steps
Adding the Basic Connection Settings for a Qlik Sense Connector
The first information that you must add in the Add Connector box consists of the connector name, type, and master credentials.
Before you Begin
- Getting the Necessary Connection Information from your Qlik Sense Administrator and Network Administrator
- Generating a Java Keystore for use with Qlik Sense
About this Task
This procedure is the third of five required in order to fully add a Qlik Sense connector.
Procedure
- Log in to Digital Hive with an account that has administrative privileges.
- Access the Systems > Manage page as described in Adding a Cognos Connector.
-
At the bottom right corner of the page, click the Add icon ().
The Add Connector box opens.
- In the Default Connector Name field, type a descriptive name for the new connector.
- From the Connector Type drop-down box, select Qlik Sense Server.
-
In the Credential Profile section, from the Profiles
drop-down list, select one of the following, based on what kind of authentication your Qlik Sense server uses:
- Qlik Sense User Pass
- Qlik Sense SSO (if your server is using SSO)
If you selected Qlik Sense User Pass, the User Name, Password, and Namespace fields display under Master credentials, along with the
Add master credentials to my credential bank check box, selected.
If you selected Qlik Sense SSO, only the User Name and Namespace
fields display.
- In the fields in the Master credentials section, enter the values provided by your Qlik Sense administrator.
Next Steps
Adding an Entry in the Server Info Sets Section
After adding the basic connection settings for a Qlik Sense connector, you must include connection settings for your Qlik Sense server in the Server info sets section.
Before you Begin
- Getting the Necessary Connection Information from your Qlik Sense Administrator and Network Administrator
- Generating a Java Keystore for use with Qlik Sense
-
Adding the Basic Connection Settings for a QLik Sense Connector
- After completing the above procedures, the Add Connector box should be open, with the Master Credentials section completed.
About this Task
This procedure is the fourth of five required in order to fully add a Qlik Sense connector.
Procedure
-
Click Add Connector Settings.
The following fields appear in the Server info sets field group:
- Server Name
- Base URL
- Path (Can leave this field empty)
- Type (QLIK_SENSE_SERVER )
- In the Server Name field, type a descriptive name for the server.
- In the Base URL field, type the access URL for your Qlik Sense server without http prefix or port number, for example ourserver.example.com.
- From the Type drop-down list, select the only connection type, QLIK_SENSE_SERVER.
Next Steps
Adding the Qlik Sense Properties
Adding Qlik Sense Properties
The final procedure in adding a Qlik Sense connector is to add Qlik Sense properties and apply your changes.
Before you Begin
Complete the steps in the following procedures:
About this Task
This procedure is the last of five required in order to fully add a Qlik Sense connector.
Procedure
-
Click Edit Properties.
The Edit Properties - Qlik
window opens, showing a table with prefilled properties and an empty
Value> column.
-
If no properties are shown, click
Add them now.
-
Complete the table as described below.
>
| Propety |
Value |
| defaultNamespace |
The header authentication static user directory, as provided by your Qlik Sense administrator. |
| rootCert |
The name of the root Java keystore file that you generated. |
| clientCert |
The name of the client Java keystore file that you generated. |
| certFolder |
On the Digital Hive server, the path to the folder containing the generated certificate |
| rootCertPass |
The password for the root certificate, as described in
Generating a Java Keystore for use with Qlik Sense.
|
| clientCertPass |
The password for the client Java keystore file that you generated. |
| xrefkey |
Can be any value you wish. |
| enginePortNumber |
Get this value from the Qlik Management Console. The default is 4747. |
| restApiPortNumber |
Get this value from the Qlik Management Console. The default is 4243. |
| servicePortNumber |
Get this value from the Qlik Management Console. The default is 443. |
| authenticationType |
Authentication type that Qlik server uses. Possible values: Digital Hive, Active Directory (the default), or Other. If set to Active Directory, Qlik Sense will verify
user's credential against AD on Qlik Sense server when user logs in.
|
| Active Directory |
Use http protocol, instead of the default, https. |
| servicePortNumberHttp |
If using http protocol, the http port if the Qlik web server is listening on a nonstandard port. |
| qlik.deepLink.showSelectionBar |
Adds a filter selection panel at the top of the Preview window for a Qlik artifact. |
-
Optional: To automatically add the default values to properties, at the bottom of the Edit Properties window click Add them now.

Digital Hive adds all properties that have defaults to the list, along with their default values.
- Click OK to close the window.
-
In the Add Connector box, click OK.
The Add Connector box closes, and an active Apply
button appears at the top right of the
Systems > Manage page.
-
Click Apply.
Digital Hive saves the Qlik Sense connector information. The Qlik Sense connector is now fully added.
Adding a QlikView Connector
The process for adding a QlikView connector is similar to adding a Qlik Sense connector, except that the if you are using NTFS authentication on your QlikView Web Server, you must install a separate
application to enable Digital Hive to work with NTFS authentication.
Before you Begin
Before you can add a QlikView connector, you must gather QlikView information from your QlikView administrator.
About this Task
The process for adding a QlikView connector can be broken down into two main procedures, listed below.
Procedure
-
Adding the Basic Connection Settings for a QlikView Connector
- Adding the QlikView Server Info Set Entries
Installing the QlikView NTFS Auth Application
If your QlikView Web Server authorization mode is set to NTFS, you must install the QlikView NTFS Auth application in order for Digital Hive to work with QlikView.
About this Task
This procedure is required only if your QlikView Web Server authorization mode is set to NTFS.
Procedure
- In your extracted Digital Hive installation archive, locate the folder, QlikView NTFS Auth , parallel to the docs, extraLib, and utils folders.
- Copy the contents of the QlikView NTFS Auth folder to your QlikView Web Server.
-
In a plain-text editor, open
application.properties
and set the following parameters for the server:
| Option |
Description |
|
server.port
|
Available https port to be used for the application |
|
server.port.http
|
Available https port to be used for the application |
- Open startTheiaAuth.bat and replace the default, C:\Program Files\Java\jdk1.8.0_65\bin\java path with the actual Java path on the server.
-
From the command line, execute
startTheiaAuth.bat
- Edit the QlikView connector in Digital Hive admin panel and set the property theiaAuthPortNumber to the application's port number that you just set.
Adding the Basic Connection Settings for a QlikView Connector
The process for adding basic connection settings for a QlikView connector is similar to and simpler than adding a Qlik Sense connector.
Procedure
- Log in to Digital Hive with an account that has administrative privileges.
- Access the Systems > Manage page as described in Adding a Cognos Connector.
-
At the bottom right corner of the page, click the Add icon ().
The Add Connector box opens, showing the Add master credentials to my credential bank check box.
- In the Default Connector Name field, type a descriptive name for the new connector.
-
From the Connector Type
drop-down box, select
QlikView Server.
-
From ther Version
drop-down list, select the version of your QlikView server.
-
If a profile exists for the connector, select it from the Profiles drop-down box.
User Name and Password fiedls appear in the Master credentials
section.
-
In the
Master credentials
section, type the User Name and Password, as provided by your QlikView administartor.
Next Steps
Adding the QlikView Server Info Set Entries
Adding QlikView Server Info Set Entries
When completing the QlikView Server info sets field group, two rows are required.
Before you Begin
Procedure
-
Click Add Connector Settings.
The following fields appear in the Server info sets field group:
- Server Name
- Base URL
- Path (Can leave this field empty)
- Type
- In the Server Name field, type a descriptive name for the QlikView Web Server.
- In the Base URL field, type the access URL for your QlikView Web Server, without port number or path, for example http://qlikview2.
- From the Type drop-down list, select the WEB_SERVER connection type.
- Click Add Connector Settings again, to spawn a second row of fields.
- In the Server Name field, type a descriptive name for the QlikView management server.
- In the Base URL field, type the access URL for your QlikView management service, without port number or path, for example http://qlikview3.
- In the Type drop-down list, select the MANAGEMENT_SERVER connection type.
-
Click Edit Properites.
The Edit Properties window opens.
-
If no properties are shown, click Add them now.
Properties appear in a table.
-
Complete the table as described below.
| Propety |
Value |
| defaultNamespace |
Use domain name (if AD is applied to the QlikView server) or the computer name (if QlikView server is just for computer’s local users). |
| qmsPortNumber |
Obtain from your QlikView administrator |
| serviceKey |
Obtain from your QlikView administrator |
| authorizationMode |
(NTFS or DMS) |
| loginType |
Default> or v (Custom is not currently supported) |
| theiaAuthPortNumber |
Port number of a separate application running on QlikView Web Server that authenticates the QlikView user in Digital Hive Game Boards.
Important: If your QlikView Web Server uses NTFS authorization, enter the port as follows:
- If your QlikView Web Server is using https protocol, enter that port in the server.port property in your QlikView NTFS Auth application.properties file.
- If your QlikView Web Server is using http protocol, enter the port in server.port.http.
|
-
Click OK to close the Edit Properties box and then again to close the Add Connector
box.
The Add Connector box closes, and a red Apply button appears at the top right of the Systems > Manage page.
-
Click Apply.
Digital Hive saves the QlikView connector information.
Next Steps
Adding a Salesforce Connector
The process for adding a Salesforce connector consists of several steps, broken down here into three procedures.
Procedure
- Preparing Salesforce and Getting Required Connection Information from the Salesforce Application
- Entering Salesforce Connection Settings
- Updating your Profile with Salesforce Credentials
Entering Salesforce Connection Settings
After your Salesforce administrator has configured the necessary settings in Salesforce and obtained the needed information, enter the information in Digital Hive.
Before you Begin
Preparing Salesforce and Getting Required Connection Information from the Salesforce Application
Procedure
- Log in to Digital Hive with an account that has administrative privileges.
-
At the top right corner of the Digital Hive interface, click the applications icon () and in the Applications box
that appears, click the Administration icon.
The Digital Hive Admin Panel panel opens.
-
In the navigation bar, click Systems.
The Systems > Manage page opens.
-
At the bottom of the corner page, click the Add icon ().
The Add Connector box opens.
- In the Default Connector Name field, type a descriptive name for the new connector.
- From the Connector Type drop-down box, select Salesforce.
-
In the Server info sets section, click Add Connector Settings.
A new set of fields appears in the Server info sets section.
-
Enter the following values in the four fields that appear:
| Server Name |
Base URL |
Path |
Type |
| SF_BASE_URL |
The base URL for your Salesforce instance, for example, https:// mycompany.my.salesforce.com |
|
REST |
-
Click Edit Properties.
The Edit Properties - (Connector name) box opens.
-
Click Add them now.
Properties appear in a table.
-
Add the following properties in the Edit Properties - (Connector name) box.
| Property (case-sensitive) |
Value |
| The value of the Consumer Key from the Salesforce Manage Connected Apps page |
The value of the Consumer Secret from the Salesforce Manage Connected Apps page |
- Click OK to close the Edit Properties box and then again to close the Add Connector box.
-
At the top right of the page, click Apply.
Digital Hive saves the Salesforce connector information.
Next Steps
Updating your Profile with Salesforce Credentials
Updating your Profile with Salesforce Credentials
After adding Salesforce connection settings, update your credentials in the My profile settings box so that you can add your first mounted folder.
Procedure
- At the top right corner of the Digital Hive interface, click your user icon.
-
In the menu box that displays, click the Profile settings icon.
The My profile settings box opens.
-
In the top menu of the My profile settings box, select Credentials.
The Credentials section, listing existing connectors, slides into view.
-
In the row for your Salesforce connector, click Edit.
The Edit Credentials for (Connector name) box opens.
-
Click Sign In.
If you have an active Salesforce session, a pop-up window quickly opens and closes, and you are notified that your credentials have been saved. If you do not have an active session, the Salesforce login
screen displays.
-
If necessary, enter your Salesforce credentials in the login form and log in there.
The pop-up window closes, and you are notified that your credentials have been saved.
Next Steps
Add one or more Salesforce mounted folders, as described in Mounting Folders.
Adding a SharePoint Connector
The process for adding a SharePoint connector consists of several steps, broken down here into three procedures.
Before you Begin
Using the SharePoint Online interface, you or your SharePoint administrator must create a SharePoint application for use with Digital Hive.
Procedure
- Getting the Necessary Connection Information from your SharePoint Administrator
- Entering SharePoint Connection Settings
- Updating your Profile with SharePoint Credentials
Entering SharePoint Connection Settings
After obtaining the necessary information from your SharePoint administrator, enter the information in Digital Hive
Before you Begin
Getting the Necessary Connection Information from your SharePoint Administrator
Procedure
- Log in to Digital Hive with an account that has administrative privileges
-
At the top right corner of the Digital Hive interface, click the applications icon () and in the Applications box
that appears, click the Administration icon.
The Digital Hive Admin Panel panel opens.
-
In the navigation bar, click Systems.
The Systems > Manage page opens.
-
At the bottom right corner of the page, click the Add icon ().
The Add Connector box opens.
- In the Default Connector Name field, type a descriptive name for the new connector.
- From the Connector Type drop-down box, select Microsoft SharePoint Online
-
In the Server info sets sections, click Add Connector Settings.
A new ser of fields appears in the Server info sets section.
-
Enter the following values in the four fields that appear, and click Add Connector Settings after each row to display another row of empty fields.
| Server Name |
Base URL |
Path |
Type |
|
AZURE_AD_AUTH_URL
|
https:// login.microsoftonline.com |
/common/oauth2/authorize
|
REST |
|
AZURE_AD_TOKEN_URL
|
https:// login.microsoftonline.com |
/common/oauth2/token
|
REST |
|
AZURE_AD_USERINFO_URL
|
https://graph.microsoft.com |
/v1.0/me
|
REST |
|
SP_BASE_URL
|
https://graph.microsoft.com |
/v1.0/drive/
|
REST |
|
MS_GRAPH_URL
|
MS_GRAPH_URL |
/
|
REST |
-
Click Edit Properties.
The Edit properties - (Connector name) box opens.
- If no properties are shown, click Add them now.
-
Enter the following information in the table shown in the Edit Properties - (Connector name) box:
| Properties |
Value |
| appId |
The application ID obtained from your SharePoint administrator |
| appSecret |
The appSecret value from your SharePoint administrator |
| redirectUri |
The Reply URL obtained from your SharePoint administrator |
- Click OK to close the Edit Properties - (Connector name) box and then click OK to close the Add Connector box.
-
At the top right of the Systems > Manage page, click Apply.
Digital Hive saves your settings.
Next Steps
Updating your Profile with SharePoint Credentials
Updating your Profile with SharePoint Credentials
After adding SharePoint connection settings, update your credentials in the My profile settings box so that you can add your first mounted folder.
Procedure
- At the top right corner of the Digital Hive interface, click your user icon.
-
In the menu box that displays, click the Profile settings
icon.
The My profile setting box opens.
-
In the top menu of the My profile settings box, select
Credentials.
The Credentials section, listing existing connectors, slides into view, with MS Power BI preselected.
-
Click Sign In.
The SharePoint Online sign-in page loads in a new browser tab.
-
Enter your SharePoint Online user name and password and click Sign In.
Digital Hive adds your SharePoint Online credentials, signs you in to SharePoint, and notifies you that the credentials have been saved.
Next Steps
Add one or more SharePoint mounted folders, as described in Mounting Folders.
Adding a Tableau Connector
The process for adding a Tableau® connector requires several steps, broken down here into discrete procedures.
Before you Begin
- Tableau® Server must be installed and running, and you must be able to access it from your network.
- Make a note of the URL used when accessing your Tableau server.
-
You need one of the following, depending on what kind of authentication your Tableau server uses:
- For challenge/response authentication: Tableau sign-in credentials and a Tableau trusted ticket must be installed on your local computer
- For SSO authentication: a valid user name
-
Obtain and make a note of the REST API version number for your Tableau® Server release by consulting the
helpful table of Tableau Server versions and their corresponding REST API versions
on the Tableau website.
Note: This URL is maintained by Tableau and is subject to change.
About this Task
All of the procedures listed below should be completed in the following order. You must add a Tableau connector for each Tableau server that you want to enable Digital Hive to see.
Procedure
- Adding a Basic Connection Settings for a Tableau Connector
-
Completing the Server Info Sets Section for a Tableau Connector
-
Completing the Edit Properties Section for a Tableau Connector
-
Testing the Tableau Connection Adding Credentials and Adding a Mounted Folder
Adding Basic Connection Settings for a Tableau Connector
This procedure is the first of four to follow when adding a Tableau® connector.
Before you Begin
- Tableau® Server must be installed and running, and you must be able to access it from your network.
- Make a note of the URL used when accessing your Tableau server.
-
You need one of the following, depending on what kind of authentication your Tableau server uses:
- For challenge/response authentication: Tableau sign-in credentials and a Tableau trusted ticket must be installed on your local computer
- For SSO authentication: a valid user name
Procedure
- Log in to Digital Hive with an account that has administrative privileges
-
At the top right corner of the Digital Hive interface, click the applications icon () and in the Applications box
that appears, click the Administration icon.
The Digital Hive Admin Panel panel opens.
-
In the navigation bar, click Systems.
The Systems > Manage page opens.
-
At the bottom right corner of the page, click the Add icon ().
The Add Connector box opens.
- In the Default Connector Name field, type a descriptive name for the new connector.
-
From the Connector Type drop-down box, select Tableau Server.
The Add Connector box refreshes and displays a Credential Profile section.
-
In the Credential Profile section, from the Profiles drop-down list, select one of the following, based on what kind of authentication your Tableau server uses:
- For challenge/response authentication: Tableau User Pass
- For SSO authentication: Tableau SSO
If you selected Tableau User Pass, the User Name and Password fields display under Master credentials, along with the Add master credentials to my credential bank check box,
selected.
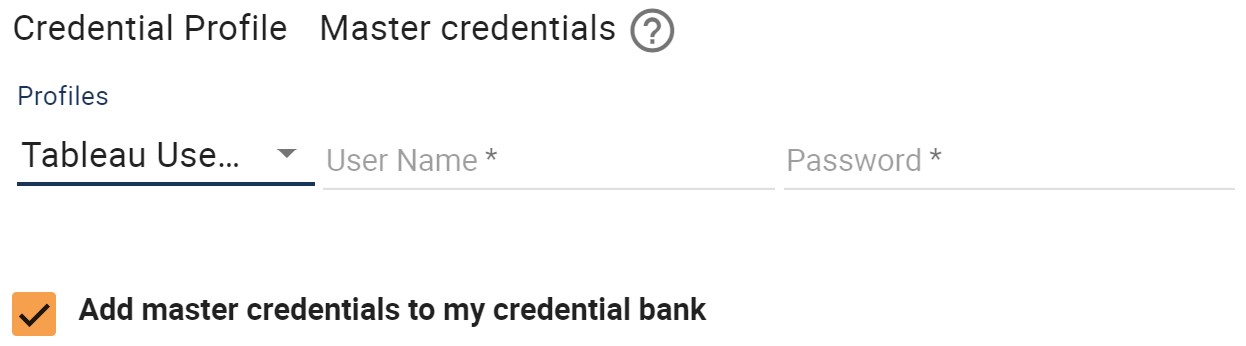
If you selected Tableau SSO, just the User Name field displays under Master credentials.
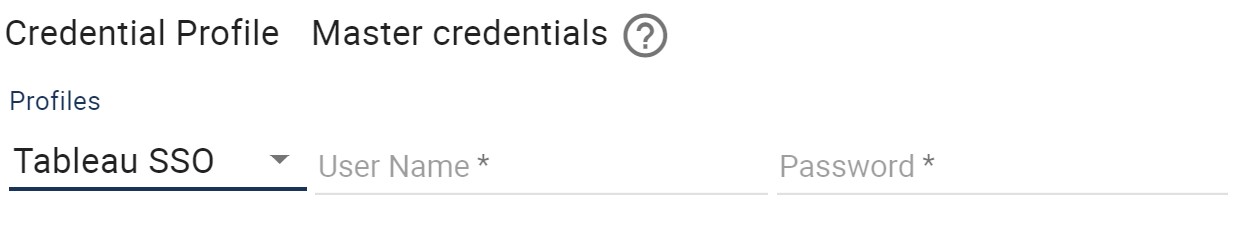
- In the Master credentials section, type the User Name and, if applicable, the Password for the Tableau server that you are connecting to.
Next Steps
Completing the Server Info Sets Section for a Tableau Connector
This procedure is the second of four required when adding a Tableau® connector.
Before you Begin
Procedure
-
Click Add Connector Settings.
A Server info sets section opens, with a second row of fields below the fields that you just completed.
- In the Server Name field, type a descriptive name for the Tableau server, to reference it in the Digital Hive user interface.
-
In the Base URL field, type the access URL fo your Tableau server.
Note: For now, disregard the Path field.
-
From the Type drop-down list, select one of the following, depending on what kind of authentication your Tableau server is using:
- For challenge/response: TABLEAU_INTERNAL_SERVER
- For SSO: TABLEAU_PUBLIC_SERVER
Next Steps
Completing the Edit Properties Section for a Tableau Connector
This procedure is the third of four required when adding a Tableau® connector.
Before you Begin
Procedure
-
Click
Edit Properties.
The Edit Properties - (Connector name) box opens.
- If no properties are shown, click Add them now.
- In the api-version row, double-click the cell in the Value column to make it editable.
- Enter the REST API version number that you obtained before starting this procedure.
- Click OK to close the Add Connector box.
-
At the top right of the Systems > Manage page, click Apply.
Digital Hive saves the Tableau connector information.
Next Steps
- Testing the Tableau Connection, Adding Credentials, and Adding a Mounted Folder
Adding a ThoughtSpot Connector
The process for adding a ThoughtSpot connector is straightforward and simple.
Before you Begin
Have available your ThoughtSpot user name, password, and base URL.
Procedure
- Log in to Digital Hive with an account that has administrative privileges
-
At the top right corner of the Digital Hive interface, click the applications icon () and in the Applications box
that appears, click the Administration icon.
The Digital Hive Admin Panel panel opens.
-
In the navigation bar, click Systems.
The Systems > Manage page opens.
-
At the bottom right corner of the page, click the Add icon ().
The Add Connector box opens.
- In the Default Connector Name field, type a descriptive name for the new connector.
-
From the Connector Type drop-down box, select ThoughtSpot.
The Add Connector box refreshes and displays Credential Profile.
-
From the Profiles drop-down list, select one of the following, based on what kind of authentication your ThoughtSpot installation uses:
- ThoughtSpot User Pass
- ThoughtSpot SSO.
s
If you selected ThoughtSpot User Pass the User Name and Password fields display under Master credentials, along with the Add master credentials to my credential bank check
box, selected.

If you selected ThoughtSpotSSO, only the User Name field appears.
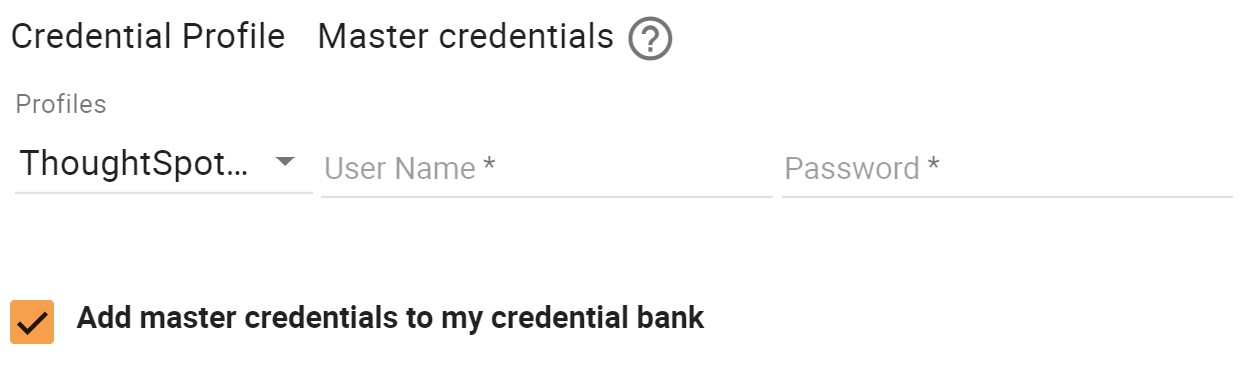
- Enter your User Name (and Password, if applicable) in their respective fields.
-
Click Add Connector Settings to display the following fields:
- Server Name
- Base URL
- Path (disregard for now)
- Type
- type a descriptive name in the Server Name field.
- In the Base URL field, type the access URL for your ThoughtSpot server.
- From the Type drop-down list, select REST.
- Click OK to close the Add Connector box.
-
At the top right of the Systems > Manage page, click Apply.
Digital Hive saves the information that you added.
Next Steps
Adding a TM1/Planning Analytics Connector
The process for adding an IBM Cognos TM1®/IBM Planning Analytics connector requires several steps, broken down here into discrete procedures.
About this Task
All of the procedures listed below should be completed in the following order. You must add a connector for each TM1/ Planning Analytics server that you want to enable Digital Hive to see.
Procedure
-
Adding the Basic Connection Settings for a TM1 Connector
-
Completing the Server Info Sets Section for a TM1
Connector
-
Completing the Edit Properties Section for a TM1
Connector
-
Testing the TM1 Connector, Adding Credentials, and Adding a Mounted sFolder
Adding the Basic Connection Settings for a TM1 Connector
This procedure is the first of four to follow when adding a TM1 connector.
Before you Begin
- A TM1 server must be running, and you must know the TM1 host name, server name, TM1 Web access URL, and login credentials.
-
Ensure that the following ports are open in the firewall on the computer running your TM1 server:
Procedure
- Log in to Digital Hive with an account that has administrative privileges.
-
At the top right corner of the Digital Hive interface, click the applications icon () and in the Applications box
that appears, click the Administration icon.
The Digital Hive Admin Panel panel opens.
-
In the navigation bar, click Systems.
The Systems > Manage page opens.
-
At the bottom right corner of the page, click the Add icon ().
The Add Connector box opens.
- In the Default Connector Name field, type a descriptive name for the new connector.
-
From the Connector Type drop-down box, select IBM Cognos TM1.
The Add Connector box refreshes and displays the User Name field in the Master credentials section. Displays the Add master credentials to my credential bank check box below.
- In the User Name and Password fields, type the login account and password for the TM1 server that you are connecting to.
- In the Namespace field, type the name of you TM1 server.
Next Steps
Completing the Server Info Sets Section for a TM1 Connector
You must complete two rows in the Server info sets section.
Before you Begin
-
Adding the Basic Connection Settings for a TM1 Connector
Procedure
-
Click Add Connector Settings.
A Server info sets section opens, with a second row of fields below the fields that you completed in
Adding the Basic Connection Settings for a TM1 Connector.
-
In the Server Name field, type a description for the name of the TM1 server you wish to enable Digital Hive to see.
Note: This field is just a descriptive name for your reference. It does not have the be the actual name of the TM1 server.
- In the Base URL field, type the URL and the TM1 SSL server port.
-
In the Path field, type actual name of the TM1 server.
For example:
Planning Sample
- In the Type drop-down list, select TM1_SDK.
- Click Add Connector Settings again, to display another row of fields.
-
In the Server Name field, type a description for the TM1® Web access site.
Note: This field is just a descriptive name for your reference.
-
In the Base URL field, type the IP address and port number that you use to access TM1 Web.
For example:
192.168.56.111:9510
-
In the Path field, type the actual domain of the TM1 web presence, preceded by a forward slash.
For example:
/tm1web
- In the Type> drop-down list, select TM1_URL_API.
Next Steps
Completing the Edit Properties Section for a TM1 Connector
This procedure is the third of four required when adding a TM1 connector.
Before you Begin
-
Adding the Basic Connection Settings for a TM1 Connector
-
Completing the Server Info Sets Section for a TM1
Connector
Procedure
-
Click Edit Properties.
The Edit Properties - (Connector name) box opens.
-
In the "Digital Hive has some property suggestions that aren't currently set." message, click Add them now.
The Edit box reloads, listing three properties:
-
defaultNamespace
-
connectionCache.tti
-
connectionCache.ttl
- In the defaultNamespace row, double-click the cell in the Value> column to make it editable
- Type the default TM1 server name.
- Click OK> to close the Edit Properties - (Connector name) box,
- Click OK to accept the settings and close the Add Connector box.
-
At the top right of the page, click Apply.
Digital Hive saves the connector information and refreshes the page.
Next Steps
Testing the TM1 Connector, Adding Credentials, and Adding a Mounted Folder
Testing the TM1 Connector, Adding Credentials, and Adding a Mounted Folder
This procedure is the last of four to follow when adding a TM1 connector
Before you Begin
-
Adding the Basic Connection Settings for a TM1 Connector
-
Completing the Server Info Sets Section for a TM1
Connector
-
Completing the Edit Properties Section for a TM1
Connector
-
After you have completed the above procedures, the Add Connector box should be closed, and the
Systems > Manage
page should be open, with an entry for the new connector visible at the bottom.
Procedure
-
If the Apply button at the top right is displaying as active, click Apply.
Note: If the number of existing connectors has caused your browser window to scroll, scroll to the top to locate the red
Apply button.
- Verify the connection, as described in Testing the Connection to a Content System>.
-
If you cleared the Add master credentials to my credential bank check box when adding basic connection settings, add login credentials for this TM1 server manually, as described in
Adding a Credential to your Digital Hive Identity.
-
Mount at least one TM1 folder, as described in Mounting Folders.
Digital Hive can now "see" the applications and cubes in your TM1 server and can display them on a Game Board.